Tampilkan postingan dengan label Tips n Trick. Tampilkan semua postingan

Minggu, Januari 29, 2012

Squid Password with htpassword

Today a successful configure squid in Ubuntu Server 11:10 and actually, once the basic settings yet there is something special, just re-read guide that is in here and here .

The next step I tried was mempassword squidnya, so that when people access, despite connect wirelessly browsing when will be forced to login with the username and password that have been made using htpassword.

How to enable htpassword first is to install apache2, how to use apt-get it, and I use NCSA Authentication Helper. Follow the steps as follows:

1. Creating a directory to store the Username and Password htpasswordnya.

eg: # mkdir / usr / lib / squid / NCSA / / * is intended spy a directory with squidnya.

2. Run the command htpassword directly from the terminal, eg:

~ # Htpasswd-c / usr / lib / squid / NCSA / login.auth dobelden / / *-c option to create the user first, if you will add a user, the same command without the-c it.

The command above means that we make direktoru login.auth and user dobelden, when there will dienter enter the new password command, follow it.

3. Setting Edit / etc / squid / squid.conf in the following sections:

auth_param basic realm Squid-Proxy-Server
auth_param basic program / ​​usr / lib / squid / ncsa_auth / usr / lib / squid / NCSA / login.auth
auth_param basic children 5
2 hours auth_param basic credentialsttl
auth_param basic caseSensitive off
REQUIRED acl ncsa_users proxy_auth

4. On the local network http_access http_access below us, attach:

http_access allow ncsa_users

After that restart squidnya, and please be tested with external connection, or from our external network, by installing a manual on the internet browser options, when in Firefox in the Menu-Option-Option-Advanced-Network-Settings and enter our proxy server IP and test by browsing, viewing requests when existing Username and Password settings brarti we've succeeded.

Thus the way of preference, may be useful.

Minggu, Mei 02, 2010

On 29 April 2010 was at 10.4 or ubuntu release tenarnya name Lucid Lynx, who many features offered as additional features, who I like is the view bootscreennya who become citizens of purple not brown anymore. On the desktop wallpaper is also no option like windows aero which could walpapernya alternate view.

Lucid Lynx on Ubuntu-based desktop, we are provided with access when it would make the turn when we need a repository for updates / install packages.

To select a repository is recommended for use there in the local repository (Indonesia) Indonesian people for our course, and the existing software ubuntu repository sources list Indonesia, who I currently use is a repository of kambing.ui.ac.id / ubuntu.

Vicarious step, select the System-Administration-Software Sources to display showing the following:

Then select the part softawe ubuntu-Download from his bow at the click until the option appears, select Other and search for Indonesia-kambing.ui.ac.id territory, such as the following picture:

Then choose the server and load, wait until the process is complete, and there we are using the Repository of kambing.ui.ac.id


Senin, Maret 29, 2010

Qmmp Player : Open Source Multimedia Player


Qmmp is Multimedia player like Winamp in windows or xmms in linux, this player supported much plugins winamp, for now stable version lauched 0.3.3.


Qmmp support Winamp and xmms skins, plugin, MPEG1 layer 1/2/3. Ogg Vorbis, FLAC, Musepack, WavePack, ModPlug, WMA Support, format from FFmpeg library, PCM Wave, AAC, CD Audio, CUE Sheet, WavPack emmbeded CUE, ALSA Sound, Jack Sound, OSS Sound, PulseAudio, last.fm/Libre.fm, Spectrum Analyzer, ProjectIM, Konversi Sample rate, efek bs2b dsp, streaming, removable device detection via HAL, MPRIS, global hotkey, playback video with MPlayer.

How to install on Ubuntu? like another application supported Ubuntu. Just Run : apt-get install qmmp at console, installation run n wait until finish.

To play go to Application -- Sound and Video -- qmmp

yihaa... interface like winamp show.. lets play your audio.

Sabtu, Maret 27, 2010

Install Cairo dock on Ubuntu Lucid Lynx

Cairo-Dock is an animated application launch bar for the desktop, comparable to the dock in Mac OS X or Rocket Dock (for Windows). Now, you can use Cairo-Dock with OpenGL.

In previus version we have to add another repository to install Cairo-Dock, but with Ubuntu Lucid Lynx we just go simple install.
First we check the availability Cairo-Dock with this command : apt-cache search cairo-dock, an the result like this :
lucid@lucid-laptop:~$ apt-cache search cairo-dock
cairo-dock - A light and eye-candy dock to launch your programs (metapackage)
cairo-dock-core - A light and eye-candy dock to launch your programs (core package)
cairo-dock-data - A light and eye-candy dock to launch your programs (common files)
cairo-dock-dev - A light and eye-candy dock to launch your programs (dev package)
cairo-dock-plug-ins - A set of plug-ins for cairo-dock
cairo-dock-plug-ins-data - Common files for cairo-dock-plug-ins
cairo-dock-plug-ins-integration - Two plug-ins for cairo-dock for a better integration in GNOME or Xfce
docky - Elegant, powerful, clean dock
python-docky - Elegant, powerful, clean dock - Python support library,

Thereis cairo-dock appear, next just run : aptitude install cairo-dock, the Cairo Dock will be installed on your ubuntu with it depedencies. After finished we can run this application with choose : Application --Accessories--GLX-Dock. To make Cairo Dock Auto run on startup, just go to System--Preferences--Startup Application, then add launcher for Cairo Dock.

For more information you can see the video from youtube.

Jumat, Maret 26, 2010

Tasksel For Simple Installation

Tasksel is an installation system that is an integral part of the Debian installer (it is also included in Ubuntu). Tasksel groups software packages by tasks and offers an easy way to install all the packages needed for that task. It provides the same functionality as using conventional meta-packages.

Tasks List

Tasks are defined in .desc files found in /usr/share/tasksel. Debian derivatives can easily add tasks.

The default list available in Ubuntu can be viewed with this command-line:

gedit /usr/share/tasksel/ubuntu-tasks.desc

Installation

tasksel has been included as part of the base installation since Ubuntu 6.10 (Edgy). Tasksel is present on all versions of Ubuntu's installer (but previously was not installed as part of the base system).

Usage

To run tasksel from the command line, type:

sudo tasksel

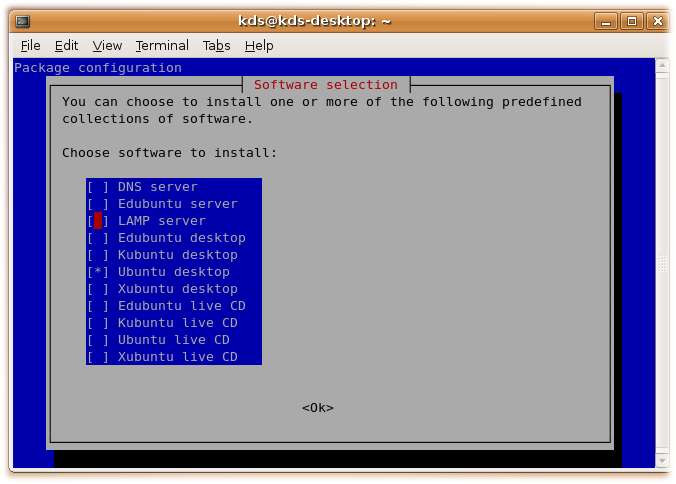
the tasksel menu will be shown:

tasksel.jpg

Already-installed tasks will have an asterisk beside their name. Select a task by scrolling down and pressing space. This will put an asterisk beside the selected task and mark it for installation. Removing an asterisk marks the task for removal. Once "ok" is selected the task installations and/or removals will take place using apt-get.

Command line arguments

You can also directly specify which task to install.

For instance, to add the Apache-MySQL-PHP stack to an existing system:

sudo tasksel install lamp-server

For complete options, see the tasksel manpage:

man tasksel

Usage (alternative)

NOTE - Calling tasks from apt-get is not documented anywhere. If you find a page that documents this, please update this page with a link.

One can alternatively install tasks with apt-get. This is the syntax:

sudo apt-get install the_name_of_the_task_you_want^

And yes, you forgot the caret (^), and yes, it is magical.

Examples:

sudo apt-get install ubuntu-desktop^ sudo apt-get install kubuntu-desktop^ sudo apt-get install lamp-server^

Task descriptions

Here are the long descriptions of a few common tasks:

  • dns-server

Selects the BIND DNS server and its documentation.

  • edubuntu-server

This task provides the Edubuntu classroom server.

  • lamp-server

Selects a ready-made Linux/Apache/MySQL/PHP server.

  • ubuntu-desktop

This task installs the Ubuntu desktop environment.

  • ubuntu-live

This task provides the extra packages installed on the Ubuntu LiveCD. It is neither useful nor recommended to install this task in other environments.

source : https://help.ubuntu.com/community/Tasksel

Minggu, Februari 28, 2010

Debian Packages Cycle : Package maintenance

Each Debian software package has a maintainer who keeps track of releases by the "upstream" authors of the software and ensures that the package is compliant with Debian Policy, coheres with the rest of the distribution, and meets the standards of quality of Debian. In relations with users and other developers, the maintainer uses the bug tracking system to follow up on bug reports and fix bugs. Typically, there is only one maintainer for a single package, but increasingly small teams of developers "co-maintain" larger and more complex packages and groups of packages.[41]

Periodically, a package maintainer makes a release of a package by uploading it to the "incoming" directory of the Debian package archive (or an "upload queue" which periodically batch-transmits packages to the incoming directory). Package uploads are automatically processed to ensure that they are well-formed (all the requisite files are in place) and that the package is digitally signed by a Debian developer usingOpenPGP-compatible software. All Debian developers have public keys.[42] Packages are signed to be able to reject uploads from hostile outsiders to the project, and to permit accountability in the event that a package contains a serious bug, a violation of policy, or malicious code.

If the package in incoming is found to be validly signed and well-formed, it is installed into the archive into an area called the "pool" and distributed every day to hundreds of mirrors worldwide. Initially, all package uploads accepted into the archive are only available in the "unstable" suite of packages, which contains the most up-to-date version of each package.

However, new code is also untried code, and those packages are only distributed with clear disclaimers. For packages to become candidates for the next "stable" release of the Debian distribution, they first need to be included in the "testing" suite. The requirements for a package to be included in "testing" is that it:[43][44]

  • Must have been in unstable for the appropriate length of time (the exact duration depends on the "urgency" of the upload)
  • Must not have a greater number of "release-critical" bugs filed against it than the current version in testing. Release-critical bugs are those bugs which are considered serious enough that they make the package unsuitable for release.
  • Must be compiled for all release architectures the package claims to support (eg: the i386-specific package gmod can be included in "testing")
  • All of its dependencies must either be satisfiable by packages already in testing, or be satisfiable by the group of packages which are going to be installed at the same time.
  • The operation of installing the package into testing must not break any packages currently in testing.

Thus, a release-critical bug in a package on which many packages depend, such as a shared library, may prevent many packages from entering the "testing" area, because that library is considered deficient.

Periodically, the Release Manager publishes guidelines to the developers in order to ready the release, and in accordance with them eventually decides to make a release. This occurs when all important software is reasonably up-to-date in the release-candidate suite for all architectures for which a release is planned, and when any other goals set by the Release Manager have been met. At that time, all packages in the release-candidate suite ("testing") become part of the released suite ("stable").

It is possible for a package – particularly an old, stable, and seldom-updated one – to belong to more than one suite at the same time. The suites are simply collections of pointers into the package "pool" mentioned above.

[edit]Security information and policy

The Debian Project, being free software, handles security policy through public disclosure rather than through security through obscurity. Many advisories are coordinated with other free software vendors and are published the same day a vulnerability is made public. Debian has a security audit team that reviews the archive looking for new or unfixed security bugs. Debian also participates in security standardization efforts: the Debian security advisories are compatible with the Common Vulnerabilities and Exposures (CVE) dictionary, and Debian is represented in the Board of the Open Vulnerability and Assessment Language (OVAL) project.[45]

The Debian Project offers extensive documentation and tools to harden a Debian installation both manually and automatically.[46] SELinux(Security-Enhanced Linux) packages are installed by default though not enabled.[47]


Source : wikipedia.org

Minggu, Februari 14, 2010

Bootloader Karmic Koala with Grub2

Today I have finished installing karmic koala, at menu loader many option to log in, and than I thing to remove some loader.

First I go to : /boot/grub/menu.lst , but viola... i cant that at my karmic koala. after googling I can find the problem, the last version of ubuntu use Grub v1 and for ubuntu karmic koala user Grub v2.

what is basicly different between Grub v1 and Grub v2?

  • menu.lst no longer controls the menu.

  • 'grub.cfg` is now in control of the menu.
  • grub.cfg is automatically generated by one of the GRUB 2 scripts.

  • The partition numbering is different.
  • Stanzas are phrased slightly differently and can't be copied directly from a GRUB 1 menu.lst to grub.cfg. They are pretty close and easy to change, though.

So according to manual from grub v2, i can edit my loader Ubuntu Karmic with : /boot/grub/grub.cfg

### BEGIN /etc/grub.d/10_linux ###
menuentry "Ubuntu, Linux 2.6.31-19-generic" {
recordfail=1
if [ -n ${have_grubenv} ]; then save_env recordfail; fi
set quiet=1
insmod ext2
set root=(hd0,10)
search --no-floppy --fs-uuid --set fa5dfed6-faa4-43b5-b0a9-6b3f623706f9
linux /boot/vmlinuz-2.6.31-19-generic root=UUID=fa5dfed6-faa4-43b5-b0a9-6b3f623706f9 ro quiet splash
initrd /boot/initrd.img-2.6.31-19-generic
}
menuentry "Ubuntu, Linux 2.6.31-19-generic (recovery mode)" {
recordfail=1
if [ -n ${have_grubenv} ]; then save_env recordfail; fi
insmod ext2
set root=(hd0,10)
search --no-floppy --fs-uuid --set fa5dfed6-faa4-43b5-b0a9-6b3f623706f9
linux /boot/vmlinuz-2.6.31-19-generic root=UUID=fa5dfed6-faa4-43b5-b0a9-6b3f623706f9 ro single
initrd /boot/initrd.img-2.6.31-19-generic
}
menuentry "Ubuntu, Linux 2.6.31-14-generic" {
recordfail=1
if [ -n ${have_grubenv} ]; then save_env recordfail; fi
set quiet=1
insmod ext2
set root=(hd0,10)
search --no-floppy --fs-uuid --set fa5dfed6-faa4-43b5-b0a9-6b3f623706f9
linux /boot/vmlinuz-2.6.31-14-generic root=UUID=fa5dfed6-faa4-43b5-b0a9-6b3f623706f9 ro quiet splash
initrd /boot/initrd.img-2.6.31-14-generic
}
menuentry "Ubuntu, Linux 2.6.31-14-generic (recovery mode)" {
recordfail=1
if [ -n ${have_grubenv} ]; then save_env recordfail; fi
insmod ext2
set root=(hd0,10)
search --no-floppy --fs-uuid --set fa5dfed6-faa4-43b5-b0a9-6b3f623706f9
linux /boot/vmlinuz-2.6.31-14-generic root=UUID=fa5dfed6-faa4-43b5-b0a9-6b3f623706f9 ro single
initrd /boot/initrd.img-2.6.31-14-generic
}
## END /etc/grub.d/10_linux ###

and change to :

### BEGIN /etc/grub.d/10_linux ###
menuentry "Ubuntu, Linux 2.6.31-19-generic" {
recordfail=1
if [ -n ${have_grubenv} ]; then save_env recordfail; fi
set quiet=1
insmod ext2
set root=(hd0,10)
search --no-floppy --fs-uuid --set fa5dfed6-faa4-43b5-b0a9-6b3f623706f9
linux /boot/vmlinuz-2.6.31-19-generic root=UUID=fa5dfed6-faa4-43b5-b0a9-6b3f623706f9 ro quiet splash
initrd /boot/initrd.img-2.6.31-19-generic
}
menuentry "Ubuntu, Linux 2.6.31-19-generic (recovery mode)" {
recordfail=1
if [ -n ${have_grubenv} ]; then save_env recordfail; fi
insmod ext2
set root=(hd0,10)
search --no-floppy --fs-uuid --set fa5dfed6-faa4-43b5-b0a9-6b3f623706f9
linux /boot/vmlinuz-2.6.31-19-generic root=UUID=fa5dfed6-faa4-43b5-b0a9-6b3f623706f9 ro single
initrd /boot/initrd.img-2.6.31-19-generic
}
## END /etc/grub.d/10_linux ###
After do that we can reboot our Ubuntu and just look different view while boot loader menu shown.

Jumat, Januari 08, 2010

SheevaPlug - a Debian home server in a wall-wart

Personally I have always been interested in unusual hardware. Coming from a background in electronics, I tend to find "standard" computer hardware rather boring and always like to experiment with stuff that is off the beaten path. So I was thrilled when I found out about the Linux-powered Marvell SheevaPlug and ordered one right away from GlobalScale Technologies for only US$99. My intended project was replacing my ageing and power-hungry home server with this tiny, power-saving device.

System-level decisions

The SheevaPlug (pictured on the left) is an ARM-based computer with a 1.2 GHz processor, 512 MB of RAM and 512 MB of Flash memory, a Gigabit Ethernet port and a USB host connector, all rolled into the tiny form factor of a wall-wart power adapter. It is offered as a development kit in the hope that developers will find cool things to do with it and jump start a new concept called "plug computing". Since its introduction, several web sites have sprung up that provide valuable information to get it up and running for a variety of applications.

Installing Linux on a device like this is nothing like the standard pop-in-a-CD-and-go install process we are accustomed to when installing Linux on a normal PC. For one thing, there is no local user interface in the form of a monitor and keyboard. There is also no CD drive, and the device has no BIOS, instead it has a powerful open-source boot-loader called U-Boot that is quite famous in embedded systems circles.

The SheevaPlug comes with a stripped-down Ubuntu already pre-installed on the Flash drive and, for many uses as a standard file or web server, this may be just fine. But I use my home server as a MythTV backend, and I was surprised to find that the pre-installed Ubuntu does not have any kernel modules installed. This caused my USB TV tuner not to be recognized. I might have been able to hack in the right modules, but since I was going to add an external USB hard drive to store network backups and recorded TV shows anyway, I decided to leave the Ubuntu installation on the Flash drive alone and install a Debian system on the USB hard drive instead.

In case someone would like to install a fresh Ubuntu, it is worth noting that the ARM edition of Ubuntu 9.10 is not compatible with the SheevaPlug processor. Ubuntu 9.10 uses the ARMv6+VFP instruction set, while the SheevaPlug processor can only handle ARMv5 instructions. As far as I know, every other distro with an ARM branch should work though, as does Ubuntu 9.04.

A quick note on running a MythTV backend on the SheevaPlug. While the SheevaPlug has a processor that is quite capable of handling many server-related workloads, it is missing a floating point unit which causes media encoding performance to be pretty poor. In my setup, I only receive over-the-air HDTV, and the incoming MPEG2 stream can be dumped straight to the hard drive without requiring extra encoding. If you were to try to make MythTV on a SheevaPlug record analog TV though, the results would likely be very poor, since the SheevaPlug doesn't have the muscle to handle the required encoding in real time. As always, use the right tool for the task. In my case, not requiring additional encoding, the SheevaPlug handles the backend tasks for both playback of recorded shows and live TV playback with time-shifting just fine.

Installation

After I had already started this project, I found out that there are different ways to install Debian on the SheevaPlug that are probably easier than what I did, but since I didn't use them, I can't comment on them here. Instead I followed the manual bootstrapping procedure described here which is probably harder, but worked well for me nonetheless. The initial step needs to be performed on a different machine that is already running Debian. I didn't follow the procedure to the letter but made some changes to customize my system. For one thing, instead of Debian "unstable", I decided to install Debian "testing". It has a kernel that is recent enough to support my TV tuner (an ATI TV Wonder 600 USB, well supported under Linux), and it is more stable than Debian's "unstable" branch.

I customized /etc/hostname, /etc/network/interfaces and /etc/fstab to fit my network and system. I decided to partition the USB hard drive to have an ext3 system partition, a 1 GB swap partition and use the rest of the drive as a JFS file system that would hold network storage, backups and MythTV recordings. I chose the lesser known JFS file system because it deals well with the large files generated by MythTV and it is well know to be light on CPU usage, a marked advantage for a low-end system like this one. I decided to skip some of the read-only-root recommendations listed in the procedure since I was not using a Flash storage device but a real hard drive.

With my hard drive now set up with the first stage of the bootstrap system, it was time to hook it up to the SheevaPlug and give it a spin. Since I needed to hook up both a USB hard drive and a USB tuner, I had to add an external USB hub to split the one USB connection on the SheevaPlug into four. I do wish the manufacturer would have included a USB hub in the SheevaPlug hardware so more than just one USB connector would be available, but alas, an external hub does the trick.

The SheevaPlug has no connection for a screen, instead the initial console is accessed through a separate USB device connection that provides a virtual serial port. In fact, two virtual serial ports are provided through this connection: one provides JTAG connectivity for very low-level debugging, the other one provides a serial console at 115,200 bps. On a Linux system, these virtual serial ports can be accessed as /dev/ttyUSBx devices, and the serial console ends up being the second device. An inconvenience is that these devices only appear after the SheevaPlug is powered up, so you have to be fast in making your serial terminal connection once the devices appear to be able to stop the automatic bootloader in time.

After changing the bootloader parameters according to the directions in the procedure, I booted and reached a Bash prompt where I could run the second stage of the bootstrap process and the remaining setup. Besides the regular Debian package sources, I also added the debian-multimedia.org repository and was pleasantly surprised how well stocked their ARM repository is. Debian proper has an excellent reputation when it comes to supporting different architectures, but I hadn't expected this to extend to third-party repositories. A MythTV package for ARM was readily available, saving me the lengthy compile-cycle I had been expecting.

Still, I wasn't able to escape compiling entirely. I ran into trouble getting the USB tuner to work, although it is supposed to work just fine under Linux. The kernel always failed to load the firmware, although I had added it according to the instructions, and the kernel could find the file just fine, but then would error out trying to add a duplicate device node. Plugging the tuner in to my netbook running sidux, it worked just fine out of the box. This had me stumped for a while, but eventually I traced the problem down to a difference in how the Debian ARM and x86 kernels are configured. The ARM kernel has an option set to have the I2C device file system compiled into the kernel, while this is a module in the x86 kernel. The USB tuner uses components that connect to each other using the I2C bus, and both the I2C device file system and the TV tuner driver were trying to create device nodes for these components. I solved the issue by having APT download the kernel sources, copying the standard kernel configuration from the /boot directory, changing this troublesome option and recompiling the kernel.

I finished my system by using apt-get to install SSH, Samba, SWAT, MySQL, MythTV, rsync and probably some other stuff I forgot. How to set all these up is beyond the scope of this article and works pretty much the same as on any other Debian system, so plenty of information is available. The only thing that is unusual and that may confuse people is how to run mythtv-setup, since this is a Qt program and the SheevaPlug has no native GUI interface. The answer is that you can use ssh -X to log in to the SheevaPlug with port forwarding, and then when you run mythtv-setup, the user interface will be exported to the machine you're logging in from.

* * * * *
Conclusion


This write-up was intended as a very high-level review of my experience setting up this unusual system, and is by no means a step-by-step walkthrough. There is plenty of detailed information available online on websites such as plugcomputer.org and computingplugs.com that can prove invaluable to get things working on the SheevaPlug. As remarked before, the system is sold as a developer's kit and setting it up is definitely not for the faint of heart or for those who avoid the terminal like the plague. In the end, I had a lot of fun getting this to work and the system is working beautifully. I learned a lot in the process and am amazed yet again at how flexible Debian is as an operating system for just about any computer, even embedded systems like this one.

About the author. Patrick Van Oosterwijck is an embedded software developer who in his professional life spends most of his days designing embedded systems and writing software for micro-controllers, usually on bare-metal devices without operating systems. His interest in Linux started about six years ago and since then he has experimented with everything from SuSE and Ubuntu to Gentoo and Buildroot. The last couple of years he has worked on several projects that apply Linux to embedded systems running on x86, Blackfin and ARM processors.

taken from distro watch issue

Jumat, Agustus 21, 2009

The status of Intel video drivers for Ubuntu

Corresponding changes were made to the Linux kernel, including migrating the new Graphics Execution Manager (GEM), which manages video memory, into the mainline kernel beginning with version 2.6.28. Setting graphics resolution, which has traditionally been done as part of the X server, has also been migrated to the kernel. Kernel Mode Setting (KMS) is now enabled by default in the most recent Ubuntu 9.10 alpha release.

The changes in both the Intel driver and the kernel also required changes to X.Org. Even my brief and decidedly less than detailed description of these changes makes it obvious that an awful lot of Linux core code has been undergoing some very major changes during the past year. Sadly, the results have, at least so far, meant that for many users of some of the most popular Linux distributions, performance did not improve. Quite the opposite: performance severely deteriorated and instability was introduced. Some users who upgraded their systems to the latest and greatest version of their favorite distribution found themselves with a system that ran very poorly, crashed frequently, or in some cases, found that X wouldn't work at all. Phoronix described their testing of Ubuntu 9.04 on a Samsung netbook this way: "...a buggy Intel Linux graphics stack led to slow performance, stability issues, screen corruption, and other problems."

I freely admit that I am not an expert on X.Org internals or graphics drivers but I've tried to follow the technical discussions, the issues involved, and how they have impacted Linux distributions. Today we'll look at the state of Intel graphics in several popular distributions, looking both at what went right and what went wrong in recent releases, what progress has been made, and what can be expected from upcoming releases.

Ubuntu 9.04 was released on April 23rd and users with Intel graphics were severely impacted. The Ubuntu forum includes a Jaunty Intel Graphics Performance Guide which offers three possible workarounds, all of which involve upgrading the Intel driver to a 2.7.x release and possibly upgrading the kernel as well. At the end of the guide are responses and reports from Ubuntu users totalling an amazing 107 pages. Glancing through the reports will reveal mixed results. For some users the problems they had experienced were completely resolved. Others reported no improvement. With my Intel Mobile Express 945GME graphics chipset the best I could achieve was either excellent performance but poor stability in the form of system freeze-ups or X crashes, or poor performance and some video corruption but excellent stability. Another workaround is to revert to an older 2.4.1 Intel driver, an approach which was abandoned early on in the forum but which worked reasonably well for me.

In the discussion which follows the Performance Guide, the Ubuntu developers make it clear they will not be porting more recent kernel builds or Intel drivers to 9.04. Development is now focused on solving the problems in time for the release of 9.10 on October 29th.

The third alpha of Ubuntu 9.10 shipped with the latest 2.8.0 Intel driver, X.Org Server 1.6.2 RC1, and a development snapshot of the Linux 2.6.31 kernel. Phoronix reported poor performance test results with this alpha but I found significant improvement on my system. Ubuntu 9.10 alpha 4, released last week, also includes a newer kernel snapshot and the 2.8.0 driver, which no longer supports EXA and DRI1. While enabling UXA and DRI2 caused instability on my system with the 2.7.x drivers I have no such problem with 2.8.0. With 3D animation enabled I do still see some brief video corruption for a second, perhaps less, when a new window is opened, and a corresponding stutter in whatever action is being performed. I wonder if the stutter I see is part of the cause of the poor performance numbers the Phoronix testers saw. Once a window is open performance seems to be very good. I see no problems at all with 2D graphics using the latest Ubuntu 9.10 build. This is the same result I reported in my review of Pardus 2009 last week. Even though this is an early alpha build with some bugs I found Ubuntu 9.10 to already be far more usable than Ubuntu 9.04.

I should mention that Ubuntu 8.04 LTS uses older code and was not affected. Ubuntu Netbook Remix 8.04 was the factory installed OS on my netbook. With all the latest updates it performs flawlessly.

source : distrowatch

Jumat, Juli 24, 2009

interface configuration in debian lenny

Debian Lenny not so different with the previous version thereis no significant changes in the interfaces configuration and the command I usually do is I like this :

1. The main interfaces configuration

support@debian ~ $ /etc/network/interfaces

Here is the main input interface in the ip address that we have, such as :

address
netmask
network
broadcast
gateway
dns-servers

2. See the list Ip address

To see list ip address we can use command :

support@debian ~ $ ip a
support@debian ~ $ ifconfig

3. See to up interfaces that connected with network :

support@debian ~ $ mii-tools

with this command we can see the interfaces connected to the network

4. To reconfigure named of interfaces, just edit this file :

support@debian ~ $ vim /etc/udev/rules.d/70_persistent-net.rules

in this file we change our interface name like : eth0 change with : eth1 , etc..

have a try...

Minggu, Juni 21, 2009

Fix Bug : Pidgin Login On Ubuntu Jaunty

After Yahoo Update his port, many instant messenging like pidgin and kopete cant login with yahoo account.

If you use Ubuntu Jaunty you can try this way to fix this problem :

Ubuntu ships Pidgin but does not update it after a release (except for security issues). For those users who desire new releases of Pidgin, we have packaged Pidgin in a PPA. If you encounter problems with these packages, try building from source and report the bug.

To setup the PPA, copy-and-paste these commands into a terminal:

sudo apt-key adv --recv-keys --keyserver keyserver.ubuntu.com \ 67265eb522bdd6b1c69e66ed7fb8bee0a1f196a8

. /etc/lsb-release

echo deb http://ppa.launchpad.net/pidgin-developers/ppa/ubuntu \ $DISTRIB_CODENAME main | \
sudo tee /etc/apt/sources.list.d/pidgin-ppa.list

Once this PPA is setup, Pidgin updates will show up in Update Manager along with the usual Ubuntu updates. The PPA will need to be re-setup only after upgrading Ubuntu.

Taken from pidgin site.

and after that you have to change your setting on managed account and double click at your username and choose advance. at pager server :scs.msg.yahoo.com change with this : cn.scs.msg.yahoo.com

like this image :
Image from : yan.irvanet.web.id

Have fun to use free open source !! :)

Kamis, Mei 21, 2009

Fix Problem Dual Boot Debian Lenny and Windows

Today I try install Debian Lenny on my Laptop, but after all any problem with my windows partition, because grub loader cant load windows system.

To fix it i try search at google and found same problem, from that information I do this step :

According to review from distrowatch, that any criticall packages is not installed why Debian Lenny install, the packages is HAL ( Hardware Abstraction Layer ). This meant that removable media was not automatically mounted. Simply installing the hal package solved this problem.

Just run : ~#apt-get install hal

Next step edit /boot/grub/menu.lst at this row :

title Microsoft Windows XP Professional
root (hd0,0)
savedefault
makeactive
chainloader +1

became :

title Microsoft Windows XP Professional
rootnoverify (hd0,0)
savedefault
makeactive
chainloader +1
just look at italic text, root change with rootnoverify. after that reboot your system and viola... bootloader running well dan you can choose windows boot option.

Selasa, Mei 19, 2009

.htaccess to protect mrtg with password

At the time of installation such as MRTG on the last post, only the entry on stage to create the look, how authentifikasi not have time to access and this will be prone to keep confidential : D . . then can use to . htaccess to give a password. But this is the step to do, but before apache condition must exist and running well :)

First off all we create a user using the passwd and htpasswd, now under the command like this:

$htpasswd -c /etc/apache2/apache-users admin
New password:
Re-type new password:

With the command that will be made with the user name admin and passwd now and there will be a file apache-users, the-c option above is included if you first create a user and passwd to .htaccess.

Then, create a file. Direktory htaccess in you will be protected, in this case is:

/var/www/mrtg/.htaccess

and the contents therein should kata2 this:

AuthName “Rahasia Sendiri”
AuthType Basic
AuthUserFile /etc/apache/apache-users
require valid-user

and make sure permission. htaccess can be accessed by the user will access the mrtg and order .htaccess authentication credentials to be allowed to mrtg, so I must have edited in:

vim /etc/apache/httpd.conf

with the change in part:

AllowOverride none

to be:

AllowOverride AuthConfig

and after disave do not forget to restart apache it. authconfig different settings for the apache and apache2. After that please try to access it with mrtg write: http://myserver/mrtg

Selasa, Mei 05, 2009

Install MRTG on Debian

http://www.menalto.com/gallery/d/42433-2/mrtg-pronto.png
Sample mrtg interface

Finally I can also install mrtg on debian Etch. Mrtg is Multi Router Traffik Grapher, namely the graph to see traffik can do through us in the router.

Need to install some of the previous packet, namely:

  1. Snmp dan Snmpd SNMP and Snmpd
  2. Mrtg Mrtg

The step-step of installation is:

Because with debian, installation easy to do with how to:

#apt-get install snmp, snmpd, mrtg and let the process run to complete ..

because there is already at cron, so I only do we:

cp /etc/mrtg.cfg /etc/mrtg.cfg.old
cfgmaker passpublic@localhost > /etc/mrtg.cfg
indexmaker /etc/mrtg.cfg > /var/www/mrtg/index.html

note :

passpublic is a community you have in /etc/snmp/snmpd.conf and make sure that snmpd is running well.

To check whether SNMP works correctly, run the following command:
snmpwalk -Os -c passpublic -v 1 localhost system

The above command will produce output like the following:

sysDescr.0 = STRING: Linux frigg 2.6.18-4-686 #1 SMP Mon Mar 26 17:17:36 UTC 2007 i686
sysObjectID.0 = OID: netSnmpAgentOIDs.10
sysUpTimeInstance = Timeticks: (29668961) 3 days, 10:24:49.61
sysContact.0 = STRING: admin
sysName.0 = STRING: jenmannii

root@jenmanni:~# vim /etc/snmp/snmpd.conf

I must be edited in the command:

#sec.name source community
com2sec readonly localhost public12
com2sec readonly 203.190.40.0/24 public23
com2sec readonly 192.168.11.1/32 public23
com2sec readonly 192.168.13.2/32 public23

#sec.model sec.name
group MyROSystem v1 paranoid
group MyROSystem v2c paranoid
group MyROSystem usm paranoid
group MyROGroup v1 readonly
group MyROGroup v2c readonly
group MyROGroup usm readonly
group MyRWGroup v1 readwrite
group MyRWGroup v2c readwrite
group MyRWGroup usm readwrite

then restart snmp with the command:

root@tyr:~# /etc/init.d/snmpd restart

root@tyr:~# cfgmaker public12@localhost > /etc/mrtg.cfg

root@tyr:~# snmpwalk -Os -c public12 -v 1 localhost system

sysDescr.0 = STRING: Linux tyr 2.4.27-2-386 #1 Wed Aug 17 09:33:35 UTC 2005 i686
sysObjectID.0 = OID: netSnmpAgentOIDs.10
sysUpTimeInstance = Timeticks: (430) 0:00:04.30
sysContact.0 = STRING: Root (configure /etc/snmp/snmpd.local.conf)
sysName.0 = STRING: tyr
sysLocation.0 = STRING: Unknown (configure /etc/snmp/snmpd.local.conf)
sysORLastChange.0 = Timeticks: (1) 0:00:00.01
sysORID.1 = OID: ifMIB
sysORID.2 = OID: snmpMIB
sysORID.3 = OID: tcpMIB
sysORID.4 = OID: ip
sysORID.5 = OID: udpMIB
sysORID.6 = OID: vacmBasicGroup
sysORID.7 = OID: snmpFrameworkMIBCompliance
sysORID.8 = OID: snmpMPDCompliance
sysORID.9 = OID: usmMIBCompliance
sysORDescr.1 = STRING: The MIB module to describe generic objects for network interface sub-layers
sysORDescr.2 = STRING: The MIB module for SNMPv2 entities
sysORDescr.3 = STRING: The MIB module for managing TCP implementations
sysORDescr.4 = STRING: The MIB module for managing IP and ICMP implementations
sysORDescr.5 = STRING: The MIB module for managing UDP implementations
sysORDescr.6 = STRING: View-based Access Control Model for SNMP.
sysORDescr.7 = STRING: The SNMP Management Architecture MIB.
sysORDescr.8 = STRING: The MIB for Message Processing and Dispatching.
sysORDescr.9 = STRING: The management information definitions for the SNMP User-based Security Model.
sysORUpTime.1 = Timeticks: (0) 0:00:00.00
sysORUpTime.2 = Timeticks: (1) 0:00:00.01
sysORUpTime.3 = Timeticks: (1) 0:00:00.01
sysORUpTime.4 = Timeticks: (1) 0:00:00.01
sysORUpTime.5 = Timeticks: (1) 0:00:00.01
sysORUpTime.6 = Timeticks: (1) 0:00:00.01
sysORUpTime.7 = Timeticks: (1) 0:00:00.01
sysORUpTime.8 = Timeticks: (1) 0:00:00.01
sysORUpTime.9 = Timeticks: (1) 0:00:00.01

root@tyr:~# cfgmaker public12@localhost > /etc/mrtg.cfg
root@tyr:~# indexmaker /etc/mrtg.cfg > /var/www/mrtg/index.html

than open file /etc/mrtg.cfg and at:

# to get bits instead of bytes and graphs growing to the right
Options[_]: growright, bits <<>

to test, mrtg running well, please open browser and type url : http://ip_address/mrtg.

the grow traffik run from left to right.

Senin, Mei 04, 2009

Dial Telkom Speedy ADSL with Debian

Some time there are problems with a modem with TPLINK, namely difficult to PPPoE mode and when it is successful the next difficulty is, when the modem is Dead, he can not autoredial itself, making the resetting with the manual.

Then show him the idea to try using the debian etch, to create the first live one block ip in the router interface in the other one with Modem, and make sure the modem can pinging from debian and the mode of modem is : BRIDGE

The next step is to prepare the packages do support for the process dial adslnya later, while in the package you should install are: pppoe and pppoeconf, installnya enough to run the command:

# apt-get install pppoe pppoeconf (* let the process continue and tetep kelarkan installation *).

Furthermore, if already installed the next step is to configurasi and run the pppoe dial speedynya experiment.

Configurasi file in: /etc/ppp/peers/dsl-provider, nah dsl-provider file in the backup so that when the first dial fail and can be repeated again.

# cd /etc/ppp/peers
# cp dsl-provider dsl-provider.ori

Now we try to do configurasi internet connection, there are some things I needed to help expedite the process of installation, including:

  1. Login name given by ADSL Provider (Speedy).
  2. Password that's also from ADSL Provider (Speedy).
  3. If more than 2 interfaces ensure speedy interface you which direction and when the modem to dial UTP is connected.

Run 'pppoeconf' I have in/usr/sbin:

# cd /usr/sbin #
# pppoeconf # Pppoeconf

* if interface more than one he will choose the interface where you connect to the modem *

Live in only enter Yes, the device will scan information:

If detected you have a modem connected, the display will appear below:

Living in yes, a notification will appear again:

There is a notification message back, as follows:

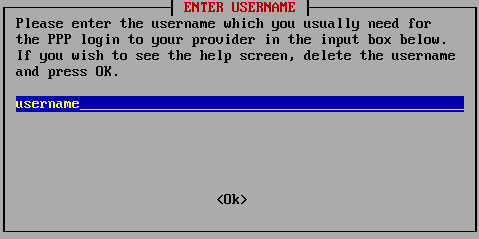
The next step is to form fill user and passwd fromADSL Provider (Speedy).

view the content of password:

Well here DNS provides the option to add the DNS Speedy in / etc / resolv.conf and then restart each resolv akan still filled by DNS from speedy, that trouble you here I met when I want to make a connection between loadbalance Speedy with a wisp, as they can not rule created a local DNS manually and can not be in the perfect configuration, but if the debian pc to normal, this is not a problem :) . .


Just chooseYes on the recommendations.

Then there will be a message for the packet size, what if you want to stay in default then yes :

Next message mengenable redeal for speedy restart each debiannya:

The next message you need to be, below:

It is finished configurasi dial speedynya, and does not need to do the same because it has automatic redial speednya.

To prove there is not connection speednya, can diliat with the command:

# ip a or ifconfig

at interface list now we have interface with the name: ppp0, nah this is pppoenya interface.